Before we start…
Before we start, we have to agree on one thing – Docker is super cool! Wait… I’ve said this before! And although I’ve also said the next things before, it’s important to note that this will not be an introduction to Docker. I believe there are a lot of articles that can explain the “What?”s and “Why?”s surrounding it. But even though some experience with both Docker and Java is expected, it is not required in order to follow through what we will cover.
The target we’ll be aiming for this time is to compile and package a Java application using Maven and serving the same application with Apache Tomcat without having anything but Docker installed. As we did in Dockerise your PHP application with Nginx and PHP7-FPM, we will use only official Docker Hub repositories. I want stress, again, that this approach lets you run any tool you need in an environment designed by its maintainers and protects you from any image changes that would potentially break your applications (which could happen, and has happened, with community repositories).
The only thing left is to install the Docker Engine, but I hope you have already done this. And even though it is not necessary, you can also install Docker Compose (we will be using it to make things a bit more readable). Now that we have a clear goal and all that we need to accomplish it – lets get this started :)
Setting up Tomcat
Since we want to test our application once we create it, it makes more sense to set up our web server first. As we set in our requirements this will be Apache Tomcat and we want to use the official Docker Hub repository, so the only thing we have to do is run the following command, which will take the official Tomcat image, run it and bind it’s port 8080 to port 8080 of our Docker environment:
docker run -it -p 8080:8080 tomcatAaaand that’s it!
Now you should be able to see the Tomcat home page on port 8080 of your Docker environment.

This covers the first part of want we initially set out to do. Let’s see if the second part will be as easy :)
Creating and Packaging a Java application using Maven
Create it!
Now comes the tricky part. If you are familiar with Maven you know that it is a CLI tool, so how do we use it without having Java installed (we agreed on this earlier)? It turns out there is an official Maven image we can use. To check if we can use it let’s run:
docker run --rm -it maven mvn --versionThe output you should get is something like this:
Apache Maven 3.3.9 (bb52d8502b132ec0a5a3f4c09453c07478323dc5; 2015-11-10T16:41:47+00:00)
Maven home: /usr/share/maven
Java version: 1.8.0_72-internal, vendor: Oracle Corporation
Java home: /usr/lib/jvm/java-8-openjdk-amd64/jre
Default locale: en, platform encoding: UTF-8
OS name: "linux", version: "4.4.6-moby", arch: "amd64", family: "unix"
Let’s break down the command we just executed. It creates a container and runs the maven command in it. The curious part is the –rm parameter, which will remove the container once the execution of the command is over.
Great! So now that we can run maven in a container let’s create a simple web application. Normally you would do this by running something along the lines of:
mvn archetype:generate \
    -DgroupId=com.mikechernev.docker.example \
    -DartifactId=DockerExample \
    -DarchetypeArtifactId=maven-archetype-webapp \
    -DinteractiveMode=false
If you are not familiar with Maven I suggest you have a look at Maven in 5 Minutes where I took this command from, with the only difference that the architecture type in our case is maven-archetype-webapp. In short, this command will create a new web application project in the DockerExample directory. Knowing how to run maven commands, we can just replace the mvn –version with this command, right? Wrong!
Since the default working directory for the Maven image is /, if we execute:
docker run --rm -it maven mvn archetype:generate \
    -DgroupId=com.mikechernev.docker.example \
    -DartifactId=DockerExample \
    -DarchetypeArtifactId=maven-archetype-webapp \
    -DinteractiveMode=false
it will create the new project in /DockerExample inside the container and this will be forever lost once the container is removed. As I mentioned, because of the –rm parameter, this will happen once the execution of the command ends. To overcome this we have to adjust our command a bit and it will look like this:
docker run --rm -it -v $(pwd):/external -w /external maven mvn archetype:generate \
    -DgroupId=com.mikechernev.docker.example \
    -DartifactId=DockerExample \
    -DarchetypeArtifactId=maven-archetype-webapp \
    -DinteractiveMode=false
If you are familiar with Docker you will notice that we mounted the current directory as /external in the container by using -v $(pwd):/external and we changed the current working dir for the container to /external with -w /external. So now when we run the command we should have the new directory DockerExample created in the mounted volume and preserving it after we destroy the container.
Package it!
Now that we have the project we need to package it. Again, the normal way of doing this is by navigating to the project directory and executing:
mvn packageWe want to run this inside a container, thus we need to mount the folder it is in as a container volume. But first lets navigate to the location of our project, in my case I just go into the DockerTest directory. Since Maven lets us specify the location of the project we have two options to package the project. The first one is to set the working directory the same way we did when we created the new application, using Docker’s -w parameter:
docker run --rm -it -v $(pwd):/project -w /project maven mvn packageThe second option is to run the command using Maven’s -f parameter to specify the location of the pom.xml and it looks like this:
docker run --rm -it -v $(pwd):/project maven mvn package -f /projectBoth commands should create a directory called target in the location of your project and it should contain your build. Since we set the artefact ID to be DockerExample it should be something like this:
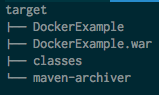
where the DockerExample and DockerExpanded.war are the expanded and archived builds.
And again – this is IT! This is all it takes to package your Java application, easy right? Right!
Now that we have the application is ready let’s serve it with the web server we prepared.
Deploying and serving your Java application
Before we get any further I want to clarify something that puzzled me a lot when I started using Tomcat and that is the app deployment. If you are familiar with Tomcat you can skip to the next paragraph, otherwise – BEHOLD! The way you deploy an application to Tomcat is by simply adding your application build to Tomcat’s webapps directory (in the case of the official Docker image that is /usr/local/tomcat/webapps). And here’s the tricky part – based on the build name added to the webapps directory Tomcat maps this application to a specific route. So if we add our DockerExample.war to the webapps as docker-example.war, we will be able to access it on /docker-example path for the Tomcat url. If you want to deploy your application without any extra paths, you have to place an artefact named ROOT. If this still sounds vague I am sure everything will be clear by the end of this blog post.
Let’s get this started!
If you navigate to your application directory you should be able to serve your application using:
docker run -it \
-p 8080:8080 \
-v $(pwd)/target/DockerExample.war:/usr/local/tomcat/webapps/docker-example.war \
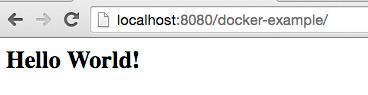
tomcatNow if we go to /docker-example on port 8080 for your Docker environment you should be able to the see the output of our basic web application:
But what if we want this to be the our website instead of just one of the many endpoints. As we said earlier, Tomcat requires a ROOT application for that. We can achieve this by modifying our Docker command to look like this:
docker run -it \
    -p 8080:8080 \
    -v $(pwd)/target/DockerExample.war:/usr/local/tomcat/webapps/ROOT.war \
    tomcat
This should do the trick, but instead gives me the opportunity to use my favourite gif again:
It turns out that the Tomcat image has an exploded artifact deployed as ROOT, so we have to modify our command a bit and it will look like this:
docker run -it \
-p 8080:8080 \
-v $(pwd)/target/DockerExample.war:/usr/local/tomcat/webapps/ROOT.war \
-v $(pwd)/target/DockerExample:/usr/local/tomcat/webapps/ROOT \
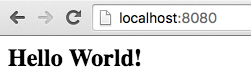
tomcatAnd now you should be getting the proper response:
And our job here is done… except for a couple of finishing touches.
Compose it!
This part is not really necessary, but if you have Docker Compose installed you could serve the application by using the following docker-compose.yml:
version: '2'
services:
  web:
    image: tomcat
    ports:
      - "8080:8080"
    volumes:
      - ./target/DockerExample.war:/usr/local/tomcat/webapps/ROOT.war
      - ./target/DockerExample:/usr/local/tomcat/webapps/ROOT
Run it!
Once you have this you can create a simple shell script to package and serve your application.
run.sh:
docker run --rm -it -v $(pwd):/project -w /project maven mvn package && docker-compose upThis is it!
We can now create, build and serve our Maven application, using only the official Docker images for Maven and Tomcat.
You can find the source code for this post here https://github.com/mikechernev/dockerised-java
P.S.: Not great for development, perfect for testing things out
As you can imagine this setup is not going to be very useful for local development, since you don’t have an easy way to debug your application (or I still haven’t figured out one). But this is a great way to quickly package and serve your application on a VPS, which is what I initially did this for. It is also a fast and easy way to test out new applications on a clean environment. That’s why I won’t suggest using this setup for local development, but I highly recommend it for deploying your application.
This is great article for beginner.
Great article. Really helpful.
great article.worked for me smoothly.
For me it didn’t work because image starts with the ROOT folder. So if I copy as ROOT.war, it didn’t get exploded since the default ROOT folder exists. So I had to write a Dockerfile where first I need to delete the ROOT folder before I copy my war as ROOT.war.
FROM tomcat:7.0.75-jre8-alpine
MAINTAINER xyz
RUN [“rm”, “-fr”, “/usr/local/tomcat/webapps/ROOT”]
COPY ./DockerExample.war /usr/local/tomcat/webapps/ROOT.war
CMD [“catalina.sh”, “run”]
Now that we have the project we need to package it. Again, the normal way of doing this is by navigating to the project directory and executing:
can you please share the path to navigate?
Great article. Really helpful.
Hi, really great article. I’ve just wondered if exist a way to create a Dockerfile with this.. thanks!
A couple of things:
1) I think you meant cd to DockerExample and not DockerTest; not a huge deal, but to someone looking to learn, this can result in frustration
2) Using docker-compose, it only ever seems to return a 404 for everything (root, virtual directory URI, etc.)
Would it be possible to include the maven packaging phase in the docker compose yml file (hence having only one command for the whole thing) ?
Hello, Great tutorials :)
Please, if I have Benchmark like TPC-W, Is there any changing in the steps of the tutorial?
Thank you
Nice job. Article was a big help.
Fantastic, thanks enjoyed it very much
Great work, thanks!
As info, you can set up your tomcat container with remote debugging.
Add environment variables JDPA_ADDRESS=8000 and JDPA_TRANSPORT=dt_socket and then run catalina.sh jpda run instead of catalina.sh run.
Make sure to publish port 8000 when you run the container. In your IDE attach the remote debugger to the container host with whatever port you published.
You can find more information searching something similar to “docker tomcat jpda” in google.
Excellent Explanation with an working scenario. Great WORK. I was nice fun to execute it.
hi
i got this below asking for property confirmation prompt and build failed from cli:
Confirm properties configuration:
groupId: com.mycompany.app
artifactId: MyJavaApp
version: 1.0-SNAPSHOT
package: com.mycompany.app
Y: :
i used below command:
docker run -it –rm -v $PWD:/java-project -w /java-project harsh123/maven:3.6.0-jdk8 \
mvn archetype:generate \
-DgroupId=com.mycompany.app \
-DartifactId=MyJavaApp \
-DarchetypeArtifactId=maven-archetype-quickstart \
-DinteractiveMode=false \
-Dversion=1.0-SNAPSHOT
pls suggest!
awesome!!
Awesome article. You’ve saved my life, man. Deadline ahead, never used docker, building a container looking like the only solution. Thank you very much.